How to Run Customizer on Your Own Computer
This page explains how you can run the kind of Customizer that used to be only available on the Thingiverse website, on your own computer in a much more responsive and reliable way.
Intro / Background
Customizer originated as a special feature of the Thingiverse website, that allowed to generate custom instances of models designed in OpenSCAD by using a web interface.
OpenSCAD is a special 3D modelling program where models are not created by manipulating them in a GUI, but by describing them with program code. This is very different from the CAD programs most people are used to, but it makes it very suitable for parametric models.
By writing the OpenSCAD files in a standard format, the Customizer interface can offer sliders, selection menus, checkboxes, and edit boxes to change the model parameters. In the website, a preview was updated (slowly) to see the effect of the chosen parameters. When the user was content with the settings, they could have the final STL model generated. This all worked fine until the dreaded gradual downward spiral that has been plaguing Thingiverse since about 2017, also nibbled at its on-line Customizer, making it often unreachable or at the least very unresponsive. At some point shortly after the horrendous March 2020 Thingiverse update that broke a lot of things, the interface did work but was squeezed into a narrow bar. I guess QA is overrated.
Luckily, a certain Amarjeet has ported the Customizer functionality to OpenSCAD itself during a 2016 Google Summer of Code project. This means you can now run Customizer on your own computer, without having to rely on the Thingiverse website, with a much better preview of your model and usually also faster results.
Instructions
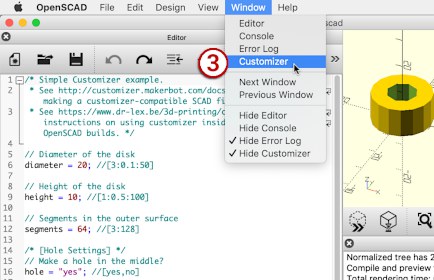
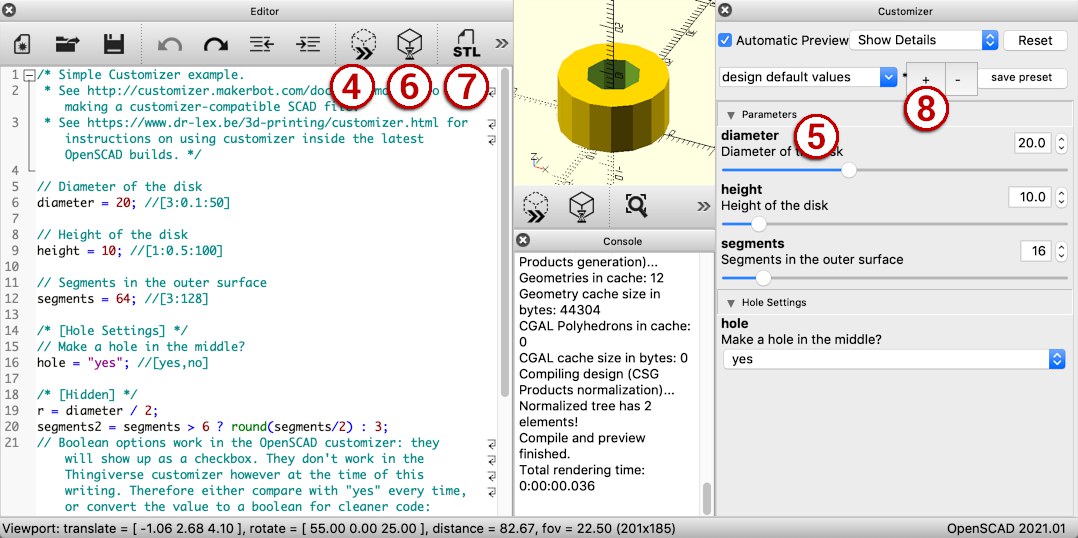
Where relevant, the circled numbers in the images correspond with the step numbers below.
- Download and install OpenSCAD. You need version 2019.05 or newer to be able to use the customizer feature. You can also use the latest development snapshot if you wish (this one has a blue icon instead of the usual yellow program icon).
These instructions were written for version 2021.01. - Download the
.scadfile of the Thing you want to customize.
If it also has a.jsonfile, you can download this as well and place it next to the.scadfile, but it is not essential.
Then open the.scadfile in OpenSCAD. - Make sure the Customizer interface is visible at the right. If it isn't, select ‘Customizer’ from the Window menu.
- Usually the customizer interface will be grayed out and unusable until you have hit the Preview button (F5) at least once.
- In the customizer pane at the right, click the triangle icons to expand controls for their sections. Now you should be able to edit the values as you would in the online Customizer. If Automatic preview is not enabled, hit the Preview button (F5) again to get a quick preview of your current settings. Even with automatic preview you may need to press enter after editing values in fields to view the effect.
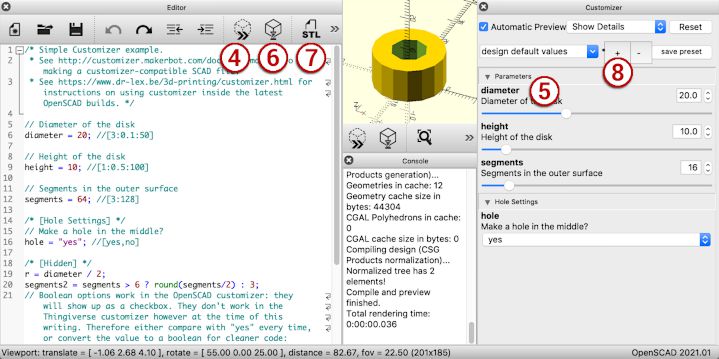
- When your configured values look good, hit the Render button (F6) to generate the final model. Depending on how complex the model is, this may take a while.
- When the model has been rendered, click the STL button to export the custom STL file.
- If you want to save your current settings, click the ‘+’ button. To update the currently selected preset, click ‘Save preset’.

OpenSCAD has two modes: a fast preview mode (F5 key), and a (usually slow) render mode (F6 key) which produces a model that can be saved for printing. Tweak the customizer parameters in preview mode, and only render when satisfied with the preview, because rendering can take long depending on how complex the model is. Finally, you must export the model to an STL file (F7 key) which you can then print like any other file you would have downloaded.
Example File
If you want to try this out, here is the example file shown in the screenshots. Even though the file produces useless objects, it could be an useful starting point if you want to learn to make your own customizer-enabled models.
Note: if you want your OpenSCAD files to work with the customizer interface on the Thingiverse website, the .scad file must not contain any non-ASCII characters (like “smart quotes”, é, ≤, …). Otherwise it will produce an obscure error. If you don't care about the Thingiverse customizer however (and considering it is usually broken you shouldn't), then by all means use all the weird characters you want.
Advanced Usage
If you cannot seem to make sufficiently accurate adjustments in the Customizer UI, you can edit them in the source code itself. This usually happens if the author has not specified a range, in that case the UI will try to guess the number of decimal places from the default number and this is not always what you want. When making your own Customizer designs, it is recommended to always specify a [minimum:step:maximum] for each numerical value.
There are some limitations compared to the Thingiverse customizer. For instance drawing a shape is not yet implemented in OpenSCAD at the time of this writing, you can only enter raw coordinates. There is also a problem with customizers that use an image as input to generate a shape, like lithophanes: if you use a PNG or JPG image, the shape will be too tall by a factor 100. You can fix this by changing the appropriate scaling factor in the source code.
Obviously Customizer can only work for Things that have been designed to be customizable. If there is no ‘Open in Customizer’ button on the Thingiverse page, you cannot magically make it customizable. Only if a thing has a .scad file, it is possible to make it Customizer-friendly but this requires basic knowledge of OpenSCAD. Here is some basic documentation about converting a scad file to make it customizable.
Dependencies
Some customizable things rely on OpenSCAD libraries that aren't installed. In that case you will get errors like: “Can't open library '…'”. You will need to find where you can download the library (e.g., ‘write’ can be found here), and place it inside the same folder as the .scad file.
The same goes for other dependencies like fonts. If you try to use a font that is not on your computer, a boring default font will be used instead. If you want to use any of the fonts that were available in the Thingiverse customizer, you will have to search for them on the web and install them on your own computer. You can of course also edit the name of the font in the source code of the .scad file, and use any font you already have on your system.
Working with Presets
The customizer inside OpenSCAD has a presets feature. If you have tweaked parameters and want to save them as a new preset, press the ‘+’ button. To update the currently selected preset, press the “save preset” button. To delete the currently selected preset, use the ‘–’ button.
Presets are saved to a .json file with the same name as the .scad file. If you want to distribute presets with your Thing, also upload the JSON file to Thingiverse or wherever you publish it. (Keep in mind that these presets only work in OpenSCAD, they are not available in the online Customizer.)
Alternative Online Customizer
The author of the MakeWithTech YouTube channel has created a website where it is possible to search through Thingiverse for customisable models and then generate custom models on servers independent of Thingiverse's. You can find this website here. Although less flexible and probably slower than running OpenSCAD on your own computer, it is convenient and of course more reliable than Thingiverse's own customizer (which at the time of this writing has a reliability of zero).