Making a Panorama With 12 Photos
This text is quite dated: all software mentioned—including QTVR itself—is obsolete and currently there are programs available that will take a set of sloppily taken snapshots and make a decent panorama out of them. However, to make a really accurate and complete panorama, following some of the advices pointed out in this text will still be helpful.
There are different methods for making a QTVR panorama from a set of photos. One of them is using Apple's QTVR Authoring Suite, which will cost you $395 at the time of this writing. Another one is using my method, which only uses an ordinary camera, preferably a tripod, a few FreeWare programs and quite a lot of computer processing time (that's the only price you have to pay!) You'll see that if you want to do it really well, it's not quite simple. But if you're not too concerned with eventual inaccuracies in the result you can skip a lot of the rigid requirements.
It must be said that there are other techniques to create panoramas. One interesting technique is to take one single snapshot through a parabolic mirror. This results in a single image containing the same information as a panorama, but in a different form, so a transformation must be applied afterwards. This technique has the big advantage that the exposure is immediately consistent all over the panorama, while this can be a major problem with multiple photographs. The disadvantage is that the required mirror can be pretty expensive, and the position of the camera relative to the mirror must be quite perfect. The resolution of the result will also be lower than when using multiple 'ordinary' photos, and the single exposure could be a problem if there are large brightness differences. In the latter case, the photo would need to be taken with a high dynamic range preserving method.
Step 1: What You Need
Of course, a camera. This can be a "classic" one as well as a digital one (which has the advantage of importing the images directly into your computer). There are two important restrictions:
1. You must be able to rotate the camera in a horizontal plane. This is the most important thing, and also the hardest to achieve. The best solution is to use a tripod for the camera with a head that can rotate, and preferably with a degree scale on it. There are specialized tripods available, but as you probably know, they'll cost you quite a lot of $$$. You could as well just take your camera in your hands or rotate it on a flat surface and try it that way, which can give satisfactory results as well as total disasters.
2. You must be able to rotate the camera around the focal point of the lens. This is not necessary for panoramas with no nearby objects in the image, but absolutely indispensible if you're going to make a panorama from an indoor scene, for instance.
Theoretically, things would also be much easier if you're able to lock the exposure of the camera, so that all images have the same exposure. Of course they would then need to be developed with a fixed exposure too. This would allow you to merge the images afterwards without having to adjust their brightness. But practically, this is almost impossible to achieve and it can pose serious problems with under- and over-exposing certain photos.
If you don't feel like buying yourself a $2000 camera+tripod, there is a very good alternative: the single-use cardboard camera. Indeed, these comply to both conditions: it's easy to rotate them in a fixed plane because of their box-shaped form, and the focal point can be guessed quite accurately. What's more, it's also easy to do this with the camera in "portrait" position, which is not the case with most tripods, and which is recommended for making a panorama (see below). If you want even more vertical 'pan', you can use a panoramic single-use camera in "portrait mode".
Next on the list is a graphics program. Each program which supports the "RAW" format, and allows you to stitch pictures together and adjust their brightness and colour balance will do, but a program like Photoshop can make your life a lot easier and the result a lot better.
Step 2: Taking the Pictures
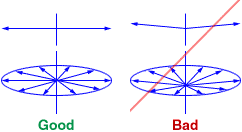
This is the trickiest part of the story. If this ain't done right, the rest will be one big mess. It comes down to this: you must take 12 or more pictures at angles of 0°, 30°, 60°, … up to 330° (in the case of 12 snapshots), while rotating the camera around its focal point in the same horizontal plane. Especially the last is very important: in mathematical words, it means that when you take a perpendicular line in the middle of each of the 12 pictures, all those lines must be in the same plane, and not in a cone which will be the case if your camera is somewhat tilted up or down (see image).
In human words, it means that the glass lens of your camera must be perfectly vertical for each picture. This is very hard, especially when you only have your bare hands to do it. That's when the cardboard camera comes in: if you put it on a wooden board or other flat surface, you can rotate it while keeping the lens almost perfectly vertical.
You should take the pictures in "portrait" mode, so with the longest side vertical. This will give you a pano with more look-up-and-down ability ("vertical pan"). Again, this is no problem with the cardboard camera, unless you have a model with a spacy streamlined design. In portrait mode, 8 snapshots - like I used in the computer games - won't do, so you'll need 12 or even 16 photos unless you have a wide angle lens. (In the rest of this document we'll assume that we're working with 12 snapshots.) If you have a zoom lens, zoom out as far as possible!
Another important thing is the light: the best moment to take the pictures is when the sun is at its highest point, or when the weather is clouded. In other cases, you have a serious risk of over-exposing a large part of the panorama, which will result in black silhouettes against a white sky. Just avoid that the sun shines straight into your lens. A panorama taken during dusk or dawn is very cool, but very hard to make. Don't try it if you're about to make the first photograph in your life.
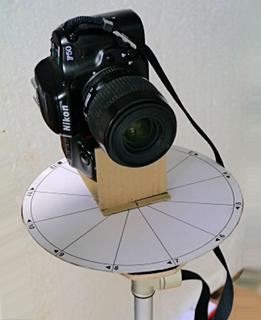
So, when you've chosen the right spot to take the pictures, you can start: put your camera in position and take the first picture. Next, rotate the camera 30°. If you have a tripod with a degree scale this will be no problem. In the case of a cardboard camera you can stick a round piece of paper to the bottom side with a degree scale. In the other cases, you'll need to guess, or rely on visual artifarcts. For example, you can put 12 stones around you which form a perfect regular polygon, and then try to take each snapshot with a stone in the middle of it.
To achieve a really perfect result, you should try to put the center of rotation at the focal point of your lens. In the case of a cardboard camera this will be approximately the same position as the lens itself. In the case of a professional camera this will be somewhere in the middle of the lens cylinder or in front of it. This is not too important unless you're taking pictures with objects close to you.
I used a peculiar construction, consisting of a pretty old tripod with a wooden board on top of it. On the board is a circle with divisions each 30°. The camera (a Nikon F50) fits in a carboard construction which can rotate around a thumbtack in the middle of the circle. If you're handy enough, you can try to make such a contraption yourself…
Take the next picture, rotate again (same direction, of course :) and so on until you're back in your starting position.
Now you have the snapshots. Next, you need to have them developed, or in the case of a digital camera you can import them into your computer right away. If you used an 'analog' camera, use a scanner. During the scanning, you can already try to tune the brightness levels of the images to a common level, or at least try to make sure there are no major changes between two adjacent photos.
Step 3: Preparing the Pictures
Now you need to prepare the pictures for merging them into one panoramic picture. In other words, this is where the serious work begins!
Now comes the point where you need to choose between using a commercial stitching program or my free program, because the way of working will be different. A good stitching program will do most transformations automatically, in other words: you only need to stuff the images in and the pano comes out on the other side, maybe with a bit of your help in between. My program is very basic so you'll have some more work. On the other hand, it's free (while a commercial stitching program costs at least $99), and when used correctly the result will be downward impeccable and often better than when just cramming the pictures through an automatic stitching program.
If you choose to use a commercial program, your journey stops here and you should read the program's manual for the rest of the story. You may also need to read the part about adjusting the picture's brightnesses & contrasts below.
If you want to do it a bit more adventurous with my program, read on!
In order to transform the pictures correctly, you need to know what the viewing angle is between the left & right border of each photo. For 12 pictures, this angle must be at least 30° + some extra for overlapping parts. The actual value depends on the lens you used and the zoom setting. For example, the viewing angle for a 35-80mm AF Nikkor lens at minimum zoom is 35°, just perfect for a panorama with 12 photos, since you have the necessary 30° + a comfortable 5° overlap.
If you really have no idea how large the viewing angle for your lens is, don't worry: there is a way to determine it exactly. Click here if you want to know how.
The pictures must be in a specific format & orientation before they can be converted: Important: the image's width and height (in pixels) must be uneven. This means, cut away one column and/or row of pixels if necessary.
Also important: you must make each picture a few percents lighter with the "Brightness" adjustment. This is to avoid having NULL-bytes in the output file, which cannot be read by the transforming program. In other words, your image must not contain pure black, red, green, blue or other colours with at least one colour channel at absolute zero.
A last necessary transformation is: flip the image vertically and then rotate 90° clockwise. This transformation allows the program to work much more efficiently.
When the images are ready, save them all in RAW format, with the following specifications:
header: 0 bytes (no header)
channels: 3; non-interleaved; unless you're working with grayscale images (in that case there is only one channel).
Important: memorize (= write down) the image dimensions in pixels!!! This is not saved in the RAW format. In fact, RAW images are really raw, they just contain the pixels in your image and nothing else. The cooking is up to you.
Step 4: Transforming the Pictures
As you can read in the mathematical page, it comes down to transforming the planar projections you now have into cylindrical projections. This is impossible without the help of a program, unless you want to spend the rest of your life calculating. What you need:
A Mac (sorry, Windozers will need to search someone who has a Mac to do this stuff, and besides, the next step uses a Mac-only program again), HyperCard or the HyperCard player (available for free at the Apple site) and a LOT of patience. Why? Because the program I made for this is very slow. It is written in HyperCard and that's one of the slowest programming environments in this universe. The reason why I haven't written it in C is because I am currently in the very early process of learning it and the only thing I can achieve is displaying a window which says "Hello World". So if you don't have at least a PowerMac, be prepared to let your Mac do some night work.
Luckily I was able to re-program the thing so it runs much faster than its first "straightforward" implementation. To give you an idea: it takes 4 hours to transform 8 pictures of 639 X 1421 pixels on a 8100/110 PowerMac (110 MHz 601, plenty of RAM). You see, not bad for an image of such resolution (you'll rarely need such accuracy), but trying the same thing on an SE will have "somewhat different" results… The previous version of the program needed almost a day for transforming just one picture of this size, so don't say that there is no progress… A "normal" image, like 211 X 413 pixels, takes only 3 minutes on the same PowerMac, and I guess that on a G3 or G4 it'll run really smooth.
You also need enough RAM, that means: HyperCard (or the HC Player) must have at least as much free memory as one snapshot takes in RAW format.
If you have all this (especially the patience is important), we can start!
The program is really small and can be downloaded here. It is in StuffIt format, so you should decompress the file with StuffIt Expander. If you have trouble downloading the file, try ctrl-clicking the link and choose "Save Link as...".
Click here to download the program! (StuffIt archive)
The program requires the following input values: The dimensions of your image, the format it is saved in (intereaved or non-interleaved), and the viewing angle.
The dimensions are the uneven values that you have written down in step 3. The format is probably: Colour and not interleaved (unless you couldn't change that in your drawing program). It takes a lot of time to open an interleaved file, that's why I told you to save it in non-interleaved format.
The viewing angle: this is the one you determined or calculated in Step 3.
I included two algorithms in the program which are optimized for the non-powerPC native and the native versions of HyperCard. The right setting can save you a lot of processing time, and the stack will determine by itself which setting it uses: If you use version 2.2 or lower or you don't have a powerMac, the "68K" setting will be checked. If you're using version 2.3 or higher on a PowerMac, the "PPC" setting will. However, it may be possible that the "PPC" setting will run faster on your 68K Mac, so you may want to experiment with this.
Now we're ready to go! Click "Process file..." and open the first image to transform. Choose a name for the result and click "Save". You'll see a message box appear which tells you how much percents of the image are converted. You'll see that this goes pretty slow too. I warned you: it can take a few minutes up to a few hours per picture. That's why I incorporated a "batch processing" option: you can first make a list of all files to be processed, and then do them all together, e.g. overnight.
Now we're a few hours (or days?) later and all the images are processed. What rests now, is merging the results together in one panoramic picture.
Step 5: Merging the Pictures
You'll need your graphics program again for this. First of all, open the converted images: they are saved in RAW format, with the following specifications:
- header: 0 (no header)
- dimensions: the dimensions of your input images, this means the dimensions of the original images, but swapped.
- format: 3 channels (for a colour image), interleaved (!)
The images need to be flipped vertically and then rotated 90° clockwise to get them back in their upright position. The rotation over 90° is not really necessary since the final result will have to be in that position, but I find it easier to work with images that are in their natural orientation.
Now the only thing that rests is putting the images together, a process called "stitching". Start with any image and take the adjacent image. Paste them together in one document and try to position the second one over the first one so they overlap as good as possible. If this isn't the case, use the drawing tools to correct as good as you can. If you estimated your field of view correctly, they should fit perfectly. If it really doesn't work you probably have chosen the wrong viewing angle in the program and you're into serious trouble: you need to start over (OH NO, NOT ANOTHER 4 HOURS!) You see: preparing the thing correctly is very very important here…
If you're sure that you used the right angle, and the images still don't seem to fit, this is probably due to the fact that the camera was not exactly horizontal when taking the pictures. In such case, the upper part of the images will be too "wide" or "narrow" compared to the lower part because of perspective distortion. This is not a disaster, at least if the error is not too large and you have a good graphics program. In PhotoShop, there is a transformation "perspective", which can compensate for the distortion. In case of such distortions, after (and before) correcting, the horizon line will not be in the middle of the image, which is a necessity for a panorama. You can solve this by cutting away a part of the images.
Next, make sure the brightness and contrast levels of all pictures are the same. Again, in a program like PhotoShop, this will be fairly easy to do. I recommend using the "Curves" filter for this since it also allows real fine-tuning. If there are real big differences between the images, you can try to make the brightness change gradually over the images so that there are no visible borders.
After you stitched all the images together (this shouldn't be too hard unless you're working on a landscape with few details), make sure the left and right borders of the result fit together too. In PhotoShop, you can use the "Offset" filter for this: offset the image horizontally with "wrap around", so that a the rightmost part of the image comes next to the leftmost part. Then try to stitch these parts together, remove remaining white space and optionally re-offset the image in the other direction.
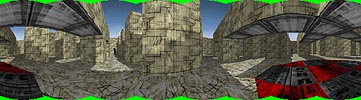
Now you have your panoramic projection! You'll notice that there will be 12 (in the case of 12 snapshots) "holes" in the top and bottom of your image, which are a result of the cylindrical projection (see the image at the right, which has 8 snapshots and thus 8 "dents" at the top and bottom, marked in green). You can get rid of these by cropping the image, or by pasting similar parts of the image on them so that they get covered by useful image data (I always do this, it doesn't need to look perfect because it's only the border of the image, and it maximizes the vertical pan).
Next, rotate the entire image 90° counter-clockwise if necessary so that the top becomes the left border, and save the result in a PICT document. Important! You must make sure that this image's height (the long size!) is divisible by 96, and the width by 4. So: re-scale the image so that it's height is a multiple of 96, and then crop it to make the width a multiple of 4. This is necessary for compatibility with Windows.
If you got this far, congratulations. I know that reaching this part of the process is a whole achievement, surely when I see that I've already needed 17 kBytes to explain it all. Luckily the last step is near, and pretty easy.
Step 6: Making the Final Panorama!
What you need for this is the "Make QTVR Pano" application from Apple. Until now, this application is only available for the Mac OS. It is available at the Apple QTVR page in the "Tools" section. Unlike the $395 QTVR Authoring Suite, this program is free!
The only thing this application does, is transforming a PICT file into a genuine QTVR panoramic movie. Open the program and then open your PICT file, or drag the file onto the application's icon. You'll get various options, of which the most important are:
- Compression: a common compression for photographic panoramas is CinePak, which ensures smooth playback on all computers. If your image has few details you can use a heavy compression (40% or lower), or you can test different settings and see the results in the preview. If you know that your panoramas will only be viewed on fast computers, you can use JPEG compression, which offers excellent image quality with very small file size, but is quite processor-intensive during playback.
- View Size: the size of the viewing window. Don't make it too large, recommended settings are: 400 X 300, or 480 X 240 for "wide-screen" effect, or smaller.
- Default Horizontal Pan: the starting position in degrees, if this is 0 you'll start on the line which makes the connection between the left and right borders of your original image.
- Default Vertical Pan: determines how much you look up or down when opening the pano, in most cases it's better to leave it 0.
- Default Zoom: Important, since wrong zoom settings will cause unrealistic distortions when viewing the panorama. In general you should use 50%, but this depends on the image dimensions. It should be set to a value which ensures a vertical field-of-view of about 90°, but it may be hard to calculate this. So just experiment with this until you get a good-looking result.
Click "Create", wait a bit and… your panorama is ready!!! You will have two resulting files: a tile movie and the actual panorama. You can trash the tile movie, unless you see a use for it. Now it's time to admire your hours (or days) of hard work.
Unfortunately, it will not always go as well as it should. If it didn't, read on.
What can go wrong…
… goes wrong, a certain Murphy once said (and he was damn right). What follows is a step-to-step problem solving to find out what went wrong during the making of your panorama.
- The panorama looks deformed, everything is warped!
This is most likely the result of an improper alignment of your camera: the horizon wasn't in the middle of your images. To solve this, you can cut off parts of the images to get things right, or even apply some perspective corrections if you're able to (no, I won't explain them here or we're busy for another 20 kBytes). In the worst case you'll need to start over from the very beginning. - The colours change all over the panorama.
This is because the images weren't adjusted enough in step 5. It is absolutely necessary that all the images have the same brightness and contrast. - I get an error message stating that the image has incompatible dimensions.
This is explained at the end of step 5: make sure the long side of the image is evenly divisable by 96 and the short side by 4. And make sure the image is rotated in such a way that the top (the sky) is at the left. - The pano jerks and shocks when viewing.
That's because you used a processor-intensive compression, or you have a slow computer (and you know what to do in the latter case). In the first case, use CinePak compression. - The colours are distorted: black has become dark gray and other colours look pale and ugly.
That's because there were NULL-bytes in your source images. Make them a few percents lighter and re-start from step 4. - I have read the rest of this file because of pure annoyment while my Mac is still calculating on the first image!
Be patient!!! Make a journey around the world or so and maybe your computer will be ready when you're back.