3D Printing with the FlashForge Creator Pro and PrusaSlicer (Slic3r)
This article describes how to use the FlashForge Creator Pro with the open-source PrusaSlicer (based on Slic3r), by means of a configuration bundle I created. If you want to see what kinds of results I get with my FFCP + PrusaSlicer, check out my makes on Thingiverse.
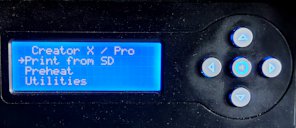
The configuration bundle is meant for the 2016 edition of the Creator Pro and might work on similar models (even from different brands) derived from the Replicator Dual. If your printer has a 4-line text display with physical buttons as in the above photo, and 2 extruders on a single carriage, it is likely compatible with these configurations. If on the other hand it has a touch display or 2 independent extruders (or only 1), then in all likelihood you will not be able to use this configuration bundle. It might be possible to use the newer FlashForge printers with PrusaSlicer if they accept any of the G-code flavours that PS can generate, but the start/stop/tool code and other configurations will most likely need to be remade from scratch.
Regardless of whether you want to use these configs or not, you may also want to check out my article with general advice about how to improve print quality and reliability.

Intro: why PrusaSlicer?
Around 2011, 3D printing broke through to the mainstream, partially thanks to certain patents expiring. As usual a bit of a hype emerged and less-than-well-informed journalists claimed that traditional stores would disappear and everyone would be downloading products and printing them at home. Of course reality slowly returned and it became clear that 3D printers are not the ultimate solution to everything, yet they are useful for specific applications. I waited for the dust to settle and in 2016, on a whim I decided to buy a 3D printer, assuming enough know-how should have been accumulated over those 5 years to produce a good commercial printer. After evaluating different models, I picked the FlashForge Creator Pro due to its competitive price point and good reviews.
To convert a 3D model into a set of instructions the printer understands, a ‘slicer’ program is needed. As the name implies, it chops up the model into layers and then derives a good path for the extruders to deposit each layer of material. The first problem I was facing back then, was that the printer came with the outdated ReplicatorG program and I wanted to use a better slicer. I didn't like the cost and closed nature of Simplify3D, therefore I looked for an open source alternative. None of the options at that time had good support for the FFCP. Slic3r looked promising because it was actively developed and had many cutting-edge features. Hence I decided to create my own configuration from scratch for it. Later on, Prusa made their own fork of Slic3r which became ‘Slic3r PE’ and eventually ‘PrusaSlicer.’ It was even more actively developed, hence I switched to PrusaSlicer instead.
The main reasons why I like Slic3r and its PrusaSlicer fork, are that many new 3D printing features are pioneered in them and only later on blatantly mimicked by the competition. PrusaSlicer started out as a fork of Slic3r with some minor changes, but is quite different now. Although obviously primarily meant to be used with Prusa printers, it is as extensible as the original Slic3r and does not lock the user into a certain printer vendor. It is being actively developed so if you find a bug or have a feature request, you can report it on GitHub and the developers will probably look into it. Or you can even fix it yourself if you have the skills.
There are other guides about setting up Slic3r with the Creator Pro, but I have noticed that many of them are outdated or keep copying the same old configuration bits full of Cargo Cult while lacking certain necessary improvements. This is why I started making my own configuration and scripts shortly after I had bought my printer, and I have been improving them ever since. I now share all these configs and scripts for everyone to use.
I only support using these configurations with recent releases of PrusaSlicer because it is much more actively developed and contains extra features compared to the regular Slic3r. Because both projects share the same source code base, my configs might also work with Slic3r 1.3.x, but I give no guarantees whatsoever.
Some important reminders
Keep in mind that the filament presets in my config bundle are tweaked for specific filaments, all-metal hot-ends, a glass printing bed, and my personal preferences. Some temperatures are too high for an unmodified Creator Pro! As a rule of thumb, you should not exceed 240°C on the standard extruders. To print at higher temperatures for extended periods, an all-metal upgrade is a must.
These configurations will move the extruders along a line at the front edge of the platform. If you use a glass plate, ensure the nozzles will not knock any mounting clips off the front corners during the start procedure. Mount the clips at the sides, about 10 mm from the front edge. Or better: use side-mounted clamps (like these) that do not stick out above the plate. If the glass plate is wider than the platform, you may have to tweak the start G-code to ensure the ‘chop’ works.
Although this config bundle may work for you out-of-the-box, it should be considered a starting point only. You must adjust the settings according to your setup and possibly specific prints. I rarely use the profiles as-is, I usually tweak things per print. Useful information can be found in the Prusa knowledge base, and also the Slic3r manual. A concise how-to can be found below.
Download the required parts
You need a set of programs and files to make PrusaSlicer work with the FFCP.
PrusaSlicer itself, obviously. The best place to download the latest release is from their GitHub page. Avoid downloading alpha releases, they may not work with my configs yet. Beta releases should be OK, but take the latest stable version if you want to avoid any issues.
GPX: PrusaSlicer can only produce text-based GCode files, but the FFCP only understands the binary X3G file format. You need GPX to do the translation. There are multiple ways to install it, one is to download it from GitHub. Do not use the 2.0-alpha version that is distributed with some older Linux distros. I recommend version 2.5 or newer. If you will be using WSL in Windows to run the post-processing script, you must install the Linux version of GPX inside the WSL environment.
In Mac OS X, you can install gpx through Homebrew. You can also use GpxUi which is available for Windows and Linux as well. If you won't be using my make_fcp_x3g.pl script, you will need to manually run gpx. You must invoke it with the argument “-m r1d” to produce correct x3g files for the FFCP.
Perl (optional): you need this to run the make_fcp_x3g.pl post-processing script. Perl is readily available in Linux and Mac OS. In Windows you need to either install it (easiest), or rely on Perl inside a WSL environment. For installing Perl in Windows itself, I recommend Strawberry Perl, although you could also use Cygwin.
ReplicatorG (optional): even though you shouldn't use this as a slicer, it is still useful for changing firmware parameters through the USB interface. You can probably ignore this but if you do need it, make sure to download the Sailfish-compatible version because other versions can cause corrupt settings.
And last but not least, the thing you probably came here for in the first place:
My configs and scripts: they are also maintained and downloadable from GitHub. There are multiple ways to download the files, simplest is to download a ZIP file of the appropriate release, or through the ‘Clone or download’ button. (If you are familiar with git, you can also clone the repository.)
This is not just on GitHub to offer downloads: it is because this is open source. If you want to contribute to these configs and scripts, feel free to make a pull request.
Installing or upgrading all the parts
Follow the instructions on the GitHub project page. When you have reached the end of the instructions, come back to this page for info on how to use what you will have installed.
As mentioned above, if you have not upgraded your extruders to all-metal, you should go through the filament presets after importing them, and ensure no extrusion temperature exceeds 240°C. The helper page now has an option to limit temperatures while transforming the ini file.
A description of what is in the repository:
Main post-processing script
The make_fcp_x3g.pl script can do several things, but its two most essential functions are:
- Automatically invoking GPX to turn your G-code file into an X3G file the printer can understand. If you wish, you can skip this automatic invocation of GPX and do it yourself or via another program (for instance the GPX plugin in OctoPrint).
- Applying an essential workaround for an annoying issue in both Slic3r (#4003) and PrusaSlicer (#2210). You cannot skip this workaround. Without it, when you're using the left extruder profile and your filament has a different second layer temperature, the right extruder will start heating after the first layer and this will probably ruin the print. If you are not going to use one of my post-processing scripts, you need to somehow ensure this workaround is applied in another way.
Next to this, the make_fcp_x3g.pl script can also invoke other post-processing scripts and can adapt end G-code to allow printing objects taller than the theoretical 150 mm limit (see the hints article for more information). It is not mandatory to use this script, but I highly recommend it. If you don't want to use the script and run into problems when doing things your own way, it will be much harder for me to help you out.
Config bundle
It comes in two variants: most likely you need the regular one. You only need the ‘MVF’ one if you have installed the MightyVariableFan system.
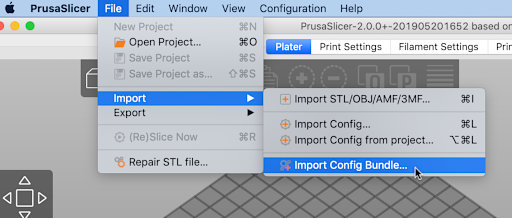
It contains the start and end G-code and sensible presets for various materials and print qualities. You need to modify the .ini file to set the post-processing script path (even if you're not going to use a script). Follow the instructions on GitHub. When done, you can load the .ini file using ‘Load Config Bundle’ in PrusaSlicer's File menu.
G-code snippets
These are included in the main config bundle, it's just easier to track changes in separate files. In the unlikely case that changes in these files were not yet included in the bundles, you can still update the snippets separately if you really want to.
Optional extras
The repository also contains another post-processing script that may help improve print quality. This script, as well as my other post-processing scripts available elsewhere like the one for dualstrusion, can be invoked by the main make_fcp_x3g.pl script. If you cannot use that script but still want to use the other scripts, you will somehow have to run the other scripts manually.
Using PrusaSlicer
I will not give a full manual for PrusaSlicer here, you should be able to find good manuals online. I will give some remarks about using it with the configs I provide above.
Before trying to actually print something, you should first do a ‘smoke test’ to test whether everything you installed works: load a simple model and hit the ‘Slice now’ button, then ‘Export G-code’. If everything is set up correctly and you have set up the post-processing script, you should find an .x3g file next to the exported .gcode file. If something went wrong, information may be found in a ‘WARN’ or ‘FAIL’ file if present. The README of the GitHub repository contains some troubleshooting hints.
Next, repeat this test but with the “FFCP Single Material L” printer profile selected. If it worked for ‘R’ but this produces no output, you are probably using the simplified BAT file and have either forgotten to install Perl, or misconfigured its path. Go through those instructions again to fix this.
Workflow
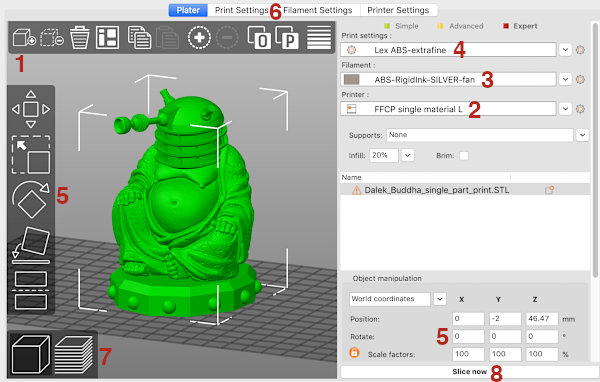
My workflow is as follows. The above screenshot shows where in the UI each step occurs. Things may be in different places in the latest releases, but the same principles do hold.
- Load one or more models. If it will be a dualstrusion, see my dualstrusion article for more details.
- Select printer profile, this determines whether you will be using the left, right, or both extruders. My config contains separate profiles marked ‘flex’. As the name implies, these should be used for flexible filaments but they are also recommended for any other filament that benefits from slower retraction speeds.
- Select filament type(s). Obviously if you are using one of the ‘Single’ printer profiles, select the filament that is loaded in the extruder you will be using. For the dual extruder profile, the top filament is the right extruder and the bottom one is the left.
For some filaments like ABS there is both a regular and a ‘fan’ profile. See the ‘cooling’ section of my hints page for more about this. In a nutshell: do not use the ‘fan’ profiles if you do not have a way to vary fan speed, except maybe when printing at ‘ultrafine’ settings. If you do have variable fan speed, keep in mind that the ‘fan’ profiles are tweaked for 0.2 mm layers and usually you need the more cooling, the thinner the layers. - Select print settings, this will determine layer thickness and other quality-related parameters of the print. Below I give an overview of what each of my print profiles do.
- Scale, rotate, duplicate, move the object(s) around if desired, and load any additional objects.
- Tweak any settings for this specific print like perimeters, infill, supports, …
- Inspect the preview and layers to see if there is nothing suspicious. Like any software, PrusaSlicer has bugs, and poorly designed STL models may cause problems like missing layers. It is better to notice and work around problems before starting the print, than finding your printer full of Angel Hair Pasta after several hours.
- Export G-code and feed the X3G file to the printer.
The right nozzle is ‘extruder 1’ and is the default; the left one is ‘2’. When you select filament in the Plater tab for a dual extrusion profile, the topmost one is extruder 1 (right), the second one is 2 (left). When dualstruding, the filament selected for extruder 1 (right) determines bed temperature unless there is only extruder 2 material in the first layer.
Note that my start G-code will first heat the extruder(s) to an intermediate temperature of 140°C and only continue heating to the actual extrusion temperature when the bed has reached its target temperature. The motivation behind this strategy is that it usually takes much longer for the bed to heat than for the extruders. By not leaving the hot-ends idle at their full temperature for a long time, oozing is minimised, as well as the risk of ‘baking’ filaments like woodfill which may result in an extruder jam.
Print settings overview
After importing the config bundle, you'll have a list of ready-to-use print settings to choose from. They are grouped per material, and per general print quality. The profiles for ABS, PLA, PETG, and flexible PLA are the most well-tweaked, the ones for NinjaFlex (TPU) should also be OK. The ones for polycarbonate (PC) were only used for a few small prints and can probably be improved. Here is a short explanation of the various profiles:
- Extrafine: prints slowly at 0.1 mm layers. For ABS, this produces the best-looking parts and usually also the strongest. Of course prints take ages and it is not necessarily the best possible profile to get maximum quality in all cases, but it is a good starting point for relatively small parts that need to look nice.
- Fine: prints a little faster at 0.15 mm layers. It will in many cases still produce very nice-looking parts that also are quite strong, but print time will be considerably shorter. This is a good all-round profile for not too big parts.
- Medium: prints at a normal speed at 0.2 mm layers. Good for the typical print you don't want to wait ages for, and which does not need to look super-detailed or be super-strong. PLA parts will probably still be very sturdy, ABS maybe less.
- MediumDetail: a bit of a hybrid between Medium and Extrafine, prints slowly at 0.2 mm layers to produce parts that still look quite nice, but take much less time to print. (For PETG there is no detail profile, because due to the lower extrusion speeds, it would be nearly the same as the regular medium profile.)
- MediumStrong: prints slowly at 0.2 mm layers with wider extrusions. If you combine this with minimal cooling, for most filaments this yields the strongest possible parts in general. ABS printed at ‘extrafine’ might still be stronger than with this profile, depending on how the part will be stressed.
- Rough: good for merely a quick prototype where looks and strength don't really matter. This prints quite fast at 0.27 mm layers. Extrusion rates will be high, you may need to boost temperatures to compensate.
- You'll also find an oddball profile ‘wireframeShapes’ that is much more suitable to print thin skeletal structures like these. This illustrates how you sometimes need to deviate completely from the usual settings to obtain an optimal result.
All settings are tweaked for 0.4 mm nozzles. I have not done any extensive tests with other nozzle sizes. If you swap out your stock nozzles for a different size, you will need to modify the configs. Of course, feel free to create your own presets. If you want to keep my pre-made print settings up-to-date, keep in mind that any changes you make to them will be overwritten the next time you load an updated config bundle. Save modified presets as copies with unique names if you don't want them to be overwritten.
About dualstrusion
The dual nozzle design of the FFCP is not a very good solution for dual material printing, partly because it was one of the first attempts at it. Originally I found the FFCP's dual nozzle setup mostly useful to always have two filaments ready for use. Eventually though, I made it a habit to remove the right nozzle and stepper motor except for the very rare occasions when I do a dualstrusion print. Removing the unused nozzle eliminates the risk that it will cause various problems by bumping into the printed part, and removing all the extraneous weight from the carriage results in a very noticeable reduction in ringing artifacts (see my hints page).
It is possible to get good quality dualstrusions despite the limitations of the single-carriage-dual-extruder setup, by sacrificing print speed and material. The current editions of PrusaSlicer however do not have the right provisions for this extruder setup, because the multi-material functionality is only optimised for Prusa printers that use a single nozzle that swaps filaments. If you attempt to use PrusaSlicer's multi-material system as-is on a FFCP, you risk ending up with a print full of ugly ooze and possibly holes as well.
To work around this, I wrote a post-processing script that does all the necessary things to get the most quality out of the single-carriage-dual-nozzle setup for a dual extrusion print. You can find the script and instructions on another page.
Advanced: updating the custom G-code in PrusaSlicer
The G-code snippets are responsible for preparing the whole printer up to the point where it can start extruding the very first layer, as well as for finishing the print and tool changes for dual extrusion. The config bundle you installed, already contains this G-code but it might not be the very latest. If you notice a more recent commit date on the Slic3r-GCode folder in GitHub than on the Slic3r-configBundles, and you badly want the latest and greatest, you can update to the latest G-code as follows.
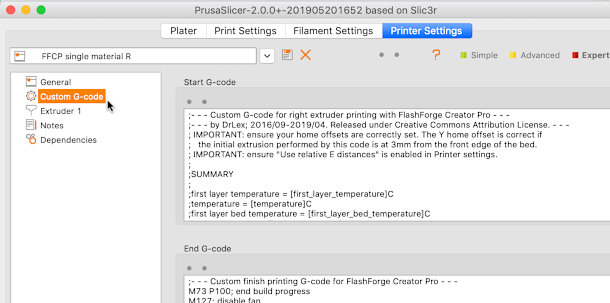
In PrusaSlicer, go to Printer Settings, set mode to ‘Expert,’ and copy the snippets from the Slic3r-GCode folder in Github to the correct places: copy each ‘Start’ snippet to the ‘Custom G-code’ section of each corresponding printer profile (left to L, right to R, dual to LR). Remember to click the save button and overwrite the config after each change. Copy the ‘End’ code to all profiles. Copy ‘ToolChange’ to both ‘Dual Material LR’ profiles. Press the ‘Save’ button when done with each profile.
Side note: why these configs make sense
If you look around on the internet, you will find copies of the same old GCode endlessly circulated with minor changes that often do not make sense. If you find GCode with codes G130 or M108 in them, do not use them with your FFCP. Those snippets have been pasted together in a cargo cult manner by people who barely had a clue what they were doing.
The code I provide has been tweaked over several years to greatly reduce the risk of prints that fail already before actual printing begins. Changes compared to the typical code snippets:
- The exact same homing procedure is used as for bed levelling, giving the best chance of homing the platform to the same height (unfortunately there are many caveats, see the hints page).
- Avoids fast unaccelerated moves.
- Coordinates have been adjusted to truly match the platform of the FFCP.
- Cargo cult cruft has been removed, including the G130 commands that could mess up factory-tweaked stepper bias settings.
- Extruder steppers are shut off entirely during heating to save power, instead of doing something stupid with bias voltages of all steppers and then resetting them to an arbitrary value.
- An intermediate temperature of 140°C is used for the extruders while the bed heats, to reduce oozing and risk of baking filament.
- Nozzles are parked in front of the platform while heating. Then they chop off oozed filament on the edge of the platform before starting the print. This greatly reduces the risk that the ooze ends up messing up your first layer. This generally allows to start prints in a fire-and-forget manner if you have properly levelled your build plate. For some really sticky filaments like PETG, it may be necessary to stick a piece of painter's tape to the front of the bed or glass plate where the chop is performed, to ensure it works reliably.
- Speeds have been tweaked to be neither too fast nor slow.
- Left and dual extruder code does a proper tool change with sufficient clearance for the nozzle swap. This means your coordinates are not all messed up and you can use correct values for the platform origin.
- Dualstrusion code does something useful and actually prepares both nozzles. Tool change code ensures the nozzle swap happens at a predictable and appropriate speed (this move is not accelerated, therefore it must not be too fast).
Long story short, the person who wrote this code, for the most part did know what he was doing. I explicitly waited to publish this code until I knew what each line did and why. There is no cargo cult in here, at best one or two lines are redundant.
Another side note: the make_fcp_x3g.pl script invokes GPX with the ‘-p’ option. This causes it to override the print percentage shown on the LCD display by estimating how long each print move takes, and making a wild guess at the pre-print warm-up time. Because of this guess and it being unaware of acceleration for print moves, it is usually overly optimistic especially at the start of the print. It is however a whole lot better than just mapping the Z axis to a percentage as Slic3r does.
What's next?
Head over to my page with hints and tips for using the Creator Pro if you want to get more out of the machine.
If you want to show appreciation for the work I have put into this, you could do so through a donation.
Legal
The GCode snippets and config bundle are released under the Creative Commons Attribution license. (In a nutshell, this means you can distribute them freely as long as you mention the origin.)
Of course, there is no guarantee whatsoever of fitness for any purpose and so on, use at your own risk.